The Invitations
One of the very first things I decided on was the invitations. My inspiration was drawn from an article in the DIY Bride magazine. In this article, they created pocketfold invitations wrapped with duponi silk. But the design of their pocketfold didn't appeal to me, nor did the interior really "wow" me. After browsing though what seems like millions of other DIY pocketfolds, I was left unsatisfied. They all seemed too plain.
I decided to brainstorm and create my own drop-dead gorgeous invitations. Invitations that no one have very seen before. Invitations that were stunning on the inside and the outside.
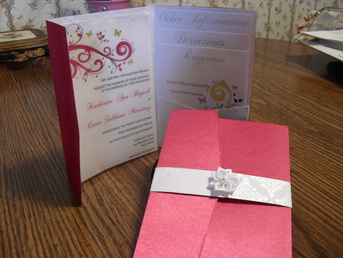
Behold! My creation!
I decided to brainstorm and create my own drop-dead gorgeous invitations. Invitations that no one have very seen before. Invitations that were stunning on the inside and the outside.
Behold! My creation!
Let's do this!
Materials:
- 12" X 12" cardstock
- Satin (1 yard [58" wide] = 15~20 invites)
- Paper trimmer (optional: with scoring blade)
- Spray adhesive
- Fray Check
- 8.5 X 11 Vellum sheets (2 invites/sheet)
- 8.5" X 11 Metallic cardstock (4 RSVP postcards/sheet)
- Metallic paper (2 inserts/sheet)
- Glue
Phase 1 - The Pocketfold
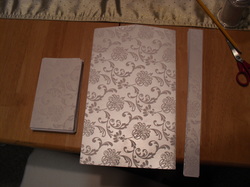 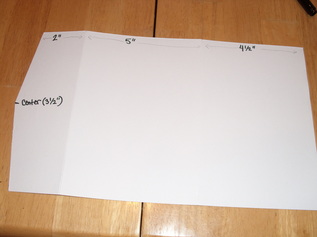  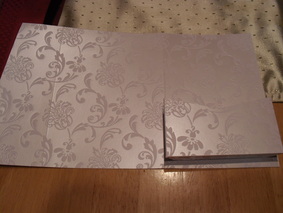   |
Step OneCut your cardstock.
One sheet of 12" X 12" will yield:
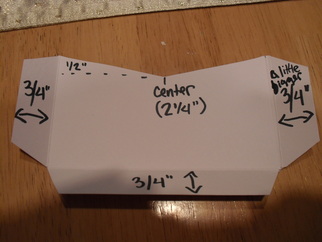
Step TwoCut the flap of the cover. Measure 1/2" from the edge of the cover (mark both edges), then mark where the center is (3.5"). Cut a straight line from each edge to the center, making a triangle (use scissors, NOT a paper trimmer!). Use this one as your "template" to trace the other covers with, so you don't need to measure each time.
Then, using a scoring blade or a bone folder, crease your cover at 4.5 inches and 9.5 inches (as shown). Step ThreeCreate your pocket.
Step FourFold in the edges of the pocket. Then put glue on the edges and align the pocket on the far right section of the cover. Place under a dictionary to flatten the pocket.
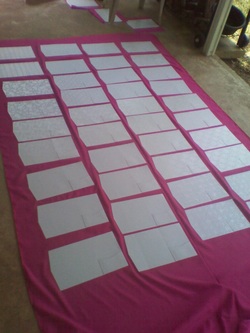
Step FiveUnfold your satin and lay it shiny-side down on a flat surface OUTDOORS. It's easier to leave the satin uncut (unless you're making 200, of course). With a helper, stretch the satin to smooth out any bumps or wrinkles.
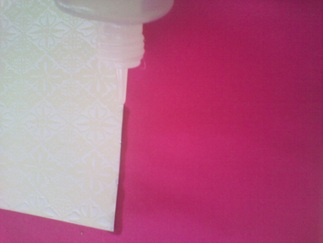
Spray the satin with spray adhesive, spray the back of your pocketfold with adhesive, then place your pocketfolds on top of the satin. Leave a 1/2" - 1" space between cards. The amount of space you leave between each card, as well as how you arrange them, will determine how many cards will fit per yard. Step SixOnce the spray adhesive dries, apply Fray Check to the very edge of the pocketfold (on the satin). That's what I took a picture of but sorry, the camera on my phone blows.
After the Fray Check has dried, cut each pocketfold from the satin using a rotary cutter. Try to keep your cuts straight and close to the edge of the card. |
Phase 2 - The Inserts
I've got some templates for you, if you don't feel like creating your own (I wish I didn't have to go through the hassle). But if you feel inclined to create your very own, here's where I got the flourish image and here's how to change it to your liking:
I opened the flourish image in Paint, then used the paint bucket tool to change the color. I then took some butterfly clipart, and opened it in Paint. Go to Edit ---> Select All [and then] Edit ---> Copy. Click back over to your flourish and go to Edit ---> Paste into New Layer. And voila! Image in an image. Adjust the size and placement before adding another layer. You may also want to flip the image by going to Layers ---> Flip Horizontally. When you're satisfied, resize the entire image to your liking (I chose ~3" x 4") and save as a JPEG file. You can then insert the image into a Word document.
To put the flourish behind the text, insert the image where ever on the text document. Then right-click on the image, and go to Format Picture. Go to the Layout tab, and select Behind Text. Ta da!
P.S.- You will need the font Chopin Script. And if you like the all-caps look, format all the characters (except the bride & groom's names) to 10.5 point font, then any uppercase characters to 11 point font. It doesn't sound like much of a difference, but it is.
| invitation_template.doc |
| other_information_template.doc |
| directions_template.doc |
| rsvp_front.doc |
| rsvp_back_template.doc |
I only had half-sheets of leftover cardstock for the RSVP postcards, so the templates above only have 2 RSVPs. What you will do is simply flip the paper 180degrees and print on the other half of your paper. Then, to print the back, just flip the paper around and print the same way. Sorry, but I didn't feel like re-doing the whole thing again.
When printing, BE SURE to use the best possible settings. I chose to use high print quality, as well as choosing the options "Vivid Photo", "Image Optimizer", "Photo Optimizer", and "Photo Noise Reduction". Your printer may or may not have these options, but click though all your printer's properties and choose any settings that sharpen, optimize, or reduce noise. Will you use more ink this way? Yes. Do you want your invitations to look even slightly blurry? Absolutely not.
I printed the invitation on vellum, the Directions and Other cards on metallic paper, and the RSVP card on metallic cardstock (paper isn't thick enough).
Phase 3 - Assembly
You'll need to trim the bottom, top, and sides of the sheets to get it to look right. I suggest experimenting with copy paper before using the good stuff. Here's the sizes you'll need to trim each insert to:
Invitation card - 6 1/2" x 4 1/2"
Other Info card - 6 3/4" x 4 1/8"
Directions card - 6" x 4 1/8"
RSVP postcard - 5 1/4" x 4 1/8"
I then put a little bit of glue on the top of the Invite card, centered it on the middle section of the pocketfold, and left it alone. BTW- I used regular Elmers and it dried clear. Then I stuffed the pocket with the other inserts in ascending order and placed it under a dictionary to flatten it.
For the belly band, I used the 1" wide strip of left over cardstock, folded it over the pocketfold, and trimmed as needed. It looks really nice if you use the same pattern that's on the inside of the pocketfold. I glued the overlapping layers together and glued a satin ribbon rose to the center (got them on ebay, just do a search if you want them).
Then stuff 'em into an A7 envelope and mail those bad boys! Due to weight, they will cost extra to mail, 20 cents more than regular rate. Also, if you want the little ribbon roses, they make the invitation too thick for machine sorting, so that's another 20 cents.
