The Save-the-Dates

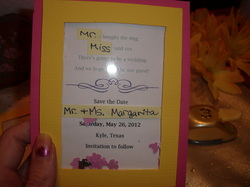
Finished product!
So no one in my family has ever seen a STD (save the date) before. I will be the first! I saw the tutorial in DIY Bride magazine and just had to have them. Then ding, a light clicked on in my head. My wedding will be Memorial Day weekend. Ta-da! Even more reason to have them!
So I don't like the tutorial in the DIY Bride magazine. It gets the point across, shows you how to do it, but their measurements are off and some of the supplies can be substituted...
I fully credit the DIY Bride magazine for this project, I'm just adding a few of my own instructions and including pictures.
So here's my tutorial! With pictures!
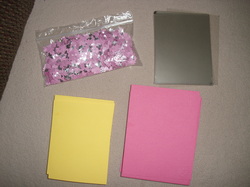
Supplies I used
- Paper cutter (seriously, get one. It makes this project so much easier)
- One sheet of hot pink cardstock, cut to 4 1/4 x 5 1/2 inches, for the back
- One sheet of yellow cardstock, cut to 3 3/4 x 5 inches, for the frame
- One sheet of white/ivory cardstock, cut to 3 1/2 x 4 3/4 in, for the wording
- One sheet of transparency film, cut to 3 3/4 x 5 inches, for the window (wear gloves while cutting to avoid fingerprints)
- Double sided tape, 1/2 inch thick
- Craft glue
- Craft knife (or a really sharp box cutter)
- Foam sheets from dollar store
- Confetti or sand or whatever you want as shakey filler material
Let's get this party started: Wording
- Open Microsoft Word and create a new document. From the File menu, click on Page Setup, then click on the Paper tab. Select Custom Page Size from the Paper Size options. Set the page size to 3 3/4 inches wide by 5 inches tall. Click OK.
- Next, set the margins. From the File menu, click on Page Setup, then click on the Margins tab. Set the margin spacing to 0.5 inch for all margins, left, right, top, bottom. Create your save-the-date wording, save, and print onto white cardstock. Be sure to set the page size to 3 3/4 x 5 inches under your printer's properties.
The window frame
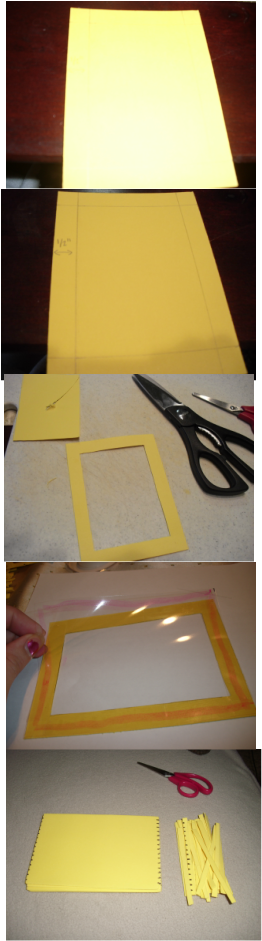
Grab the cardstock you will be using for the frame. It will be raised with little strips of the foam sheets you got at the dollar store. You'll see how this happens in just a moment.
On the back of your cardstock, draw a straight line from top to bottom and side to side, 1/2 inch from the edge on each side.
Using a straight edge and a craft knife (can't find one? Scissors work, but not as nicely), cut along the pencil marks and remove the center.
Use this one as your "template", so you don't have to measure each and every sheet exactly.
Still working on the back side of the cardstock, run a line of double-sided tape along the edge of the frame.
Place the transparency sheep on top of the adhesive, pressing firmly into place.
Remember those foam sheets you got? Using scissors, cut at least 8 of them into little strips, about 1/4 inch wide. Half of them will be left this size, half of them will need to be trimmed to fit the smaller inside edge of the frame (just eyeball it).
What's up with the black marks? you ask. A mistake, that's what. Pretend they aren't there.
The magazine says to use foam tape from home improvement stores. I found this way, with the foam sheets, is more labor-intensive, but at about a tenth of the cost of foam tape. And isn't that the point of DIY? To save money??
Cuz this is FILLER...FILLER NIGHT And no one's gonna save you from the glue about to strike...
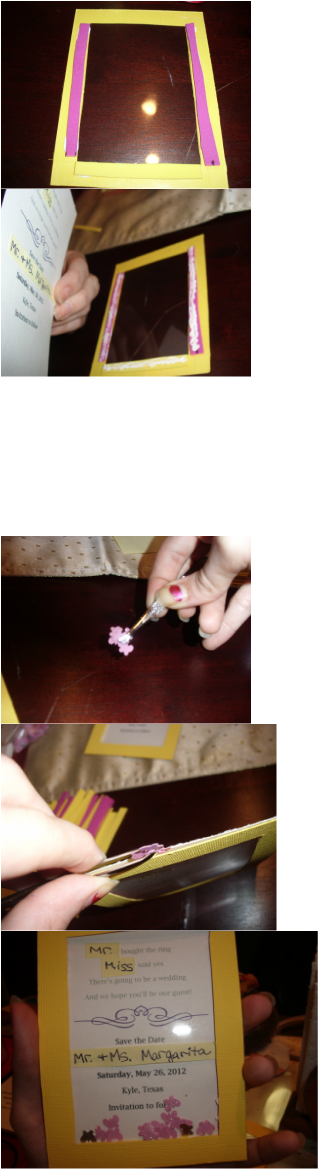
Glue the foam strips onto the back of the transparency film. That pink stuff is just a foam sheet in a different color, so you guys can see better.
Leave the top WITHOUT a strip of foam, as this is where you will be adding your fun stuff.
Spread some craft glue on the foam and place the white cardstock (with the wording) upside down onto it. Adjust as needed so the wording is centered.
I did it this way because I haven't yet printed our wedding website on the back of the pink sheet and FI needs to emboss it. I went backwards on the instructions to allow this to be done.
The magazine says to adhere the white cardstock to the back (pink) cardstock using double-sided tape, then adhere the frame. I'm doing it backwards.
Very Important: Let the glue COMPLETELY DRY before adding your filler. Otherwise, the filler will get glued to any glue the smooshes out the edges. And then its not a fun shakey thing because your filler doesn't shake. If you glue all your STD's, the glue will be dry on the first one by the time you're done with the last one.
Now that the glue is dry, you can add your filler!
Here you see a tweezer full of butterfly confetti. I'm using tweezers so you can see, but after this one, I just used my fingers. If you're using sand, use a spoon.
Slip the filler into the space at the top that you left without any foam. Add as little or as much as you please!
To seal everything up, put glue on both sides of a foam strip and carefully place it where it needs to go (at the top). Tweezers help with this part. (sorry I don't have a picture of how I did that).
Ta-da! But we're not finished yet.....
Last but not least, the back
So I finally printed the wedding website onto the back of the back so when guests turn my STD over, they can see our website. There wasn't really any room left on the white cardstock to add that info. If you want to do this too, just size the paper to 4 1/4 inches wide x 5 1/2 inches tall and center your website info.
Put double sided tape on the back of the white cardstock and center it onto the back sheet. Press firmly to set and voila! Project Save The Date complete!!!
Put double sided tape on the back of the white cardstock and center it onto the back sheet. Press firmly to set and voila! Project Save The Date complete!!!
Cost breakdown
For 32 save-the-dates, my costs were as follows:
TOTAL: $21.38 or 67 cents each
*indicates half retail price (Hobby Lobby weekly specials)
- 8 sheets hot pink textured cardstock (8 1/2 x 11 in) - $1.76*
- 8 sheets lemon yellow textured cardstock (8 1/2 x 11 in) - $1.76*
- White cardstock pack (50 sheets) - $2.50*
- Transparency film (ebay) - $3.20
- 1 sheet of glitter cardstock (for confetti) - $0.99
- Butterfly paper punch (ebay) - $2.40
- Double-sided tape (130 inches) - $1
- Double-sided tape refill (1000 inches) - $4.50
- Craft glue - $3.27
TOTAL: $21.38 or 67 cents each
*indicates half retail price (Hobby Lobby weekly specials)
